Rotis is a traditional Indian recipe for preparing the classic flour flatbread made from chapati flour (also known as atta flour) that's prepared with warm water for a soft dough that puffs up when cooked. The full recipe is presented here and I hope you enjoy this classic Indian version of: Rotis.
(click this button to prevent the screen from sleeping so Cook Mode is 'ON')
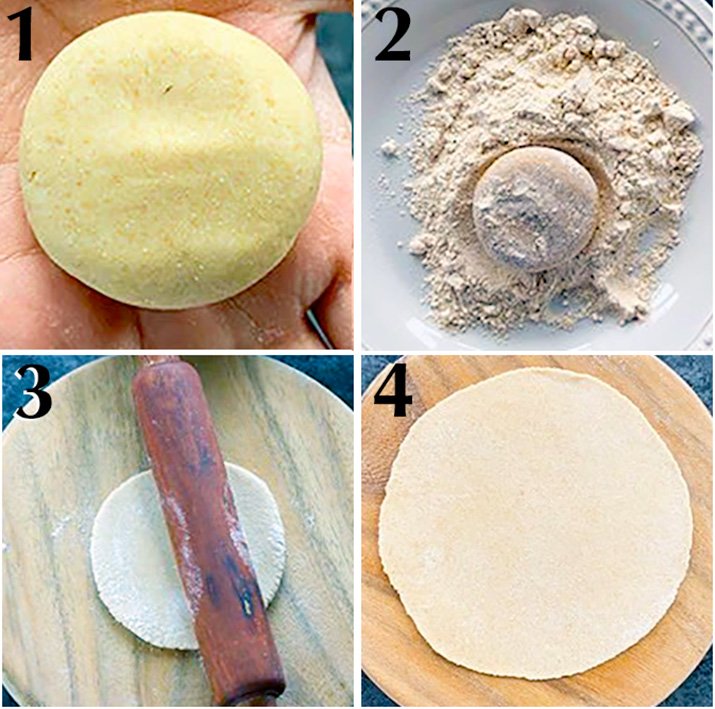
The first four stages of preparing rotis.
The first next stages of preparing rotis.
Pale-brown in colour and gritty in texture, chapati flour is finely milled wholewheat flour, also known as 'atta'.
The ideal roti puffs up when cooked and often it’s cooked directly on a gas flame to get this effect. Durban rotis, however are not cooked to puff. However, regardless of the effect you are looking for rotis should be soft and pliable and not hard.
To ensure a soft roti, make your dough with warm (not cold water). You need a soft dough not a hard one. Basically, when your dough is kneaded you know it’s soft when you can poke it with your fingers and the indentations of your fingers remain.
Remember to allow the dough to rest for 30 minutes. This allows the gluten molecules to relax, which is the secret of a soft dough. If your dough is soft enough, you’re also ¾ of the way to getting your dough to puff.
Don’t roll the roti too thin; you’re aiming for about 15cm (6 in) in diameter. Also, the more evenly you roll the roti, the more chance it has of puffing up.
Ingredients:
250g (2 cups) atta whole wheat flour
2 tsp oil
180ml (3/4 cup) warm water (about)
Ghee to brush the rotis
Flour (about 120g (1 cup)), for dusting
Method:
Finishing the rotis.
Sift the 250g atta flour into a bowl. You can add a little oil or ghee at this point if you like (however, I did not). Form a well in the centre of the flour and add the warm water a little at a time, mixing with your hands to bring the dough together. Typically, the 180ml water plus or minus a tbsp will be enough.
Once the dough comes together begin kneading. Fold the dough over with your palm and knead with your knuckles. Keep kneading for about 10 minutes, or until the gluten is released and the dough feels sot and pliable. If the dough is too stiff at this point add a little more water.
The final dough should be smooth, and when you press your fingers into the surface they should leave an impression. Shape the dough into a ball, cover with a damp cloth and set aside to rest for 30 minutes.
Once the dough has rested knead lightly then divide into 12 equal portions. Take each portion, one at a time and roll into a ball. If your dough is right you should be able to form a smooth ball with no cracks in its surface.
Turn the remaining flour onto a plate, then take the first dough ball and flatten between your palms. Dip in the flour on both sides then place on a board and begin rolling with your rolling pin. You need to roll evenly with gentle pressure from one side of the dough to the other. As you move around you should get a smooth circular shape. As soon as the dough threatens to stick to your rolling pin dip both sides back in the flour and roll again.
You are looking for a 15cm (6 in) round. If you have on heat a tawa (otherwise use a cast iron skillet) on medium-high heat. Once hot enough remove any excess flour from the roti and place on the tawa. Heat for about 20 seconds on the first side, or until you see some bubbles forming on the top. Now flip the roti and cook for about 30 seconds on the other side. Use a pair of tongs to check the roti (when done it should have brown spots all over).
Take the roti from the pan using tongs and place directly against the gas flame (angle the first side, which was cooked less against the flame). All being well, the roti should puff up very quickly. Take off the heat, brush with ghee and serve.
If you don’t have a glass cooker, rather than applying to a flam flip the roti over onto the side that was cooked less then press the roti with kitchen paper or with a cotton cloth. As you remove the cloth away the roti should puff up. Now flip over again and cook a little more on the other side.
At this point, remove with tongs, brush with ghee and serve. Now cook the remaining rotis in the same fashion.

 Click on the image, above to submit to Pinterest.